How Google Authorship Changes the Rules for your Search Results
If you asked me what was the single most important thing that you could do right now to improve your SEO, I’d say make sure you are set up for Google Authorship.
Hands down.
Period.
Full Stop.
End of story.
See, we’ve come to expect certain things to always be true. One of those was you needed to fight to be on the first page of search results. (Still true). Second is, the closer to the top the better.
But what if this second point was no longer as definitive as it was in the past?
By now, you’ve probably noticed that many people have their pictures next to blogs or articles that they’ve authored in Google search results. As it turns out, there’s a very practical impact that comes with having one’s picture next to those search results.
Consider the following top search results for “Writing a Great Blog”:
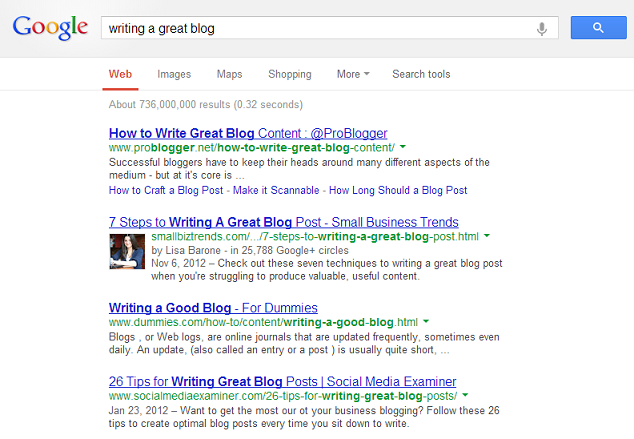
Google Search Results for “Writing a Great Blog”
What is the first result that catches your eye?
The odds are that you moved right past the top result to Lisa Barone’s beautiful picture next to her post on 7 Steps to Writing A Great Blog Post. The picture next to the result conveys a sense of authority that the other results do not have.
That’s interesting, but Lisa’s post was the second result. What about a results further down the page?
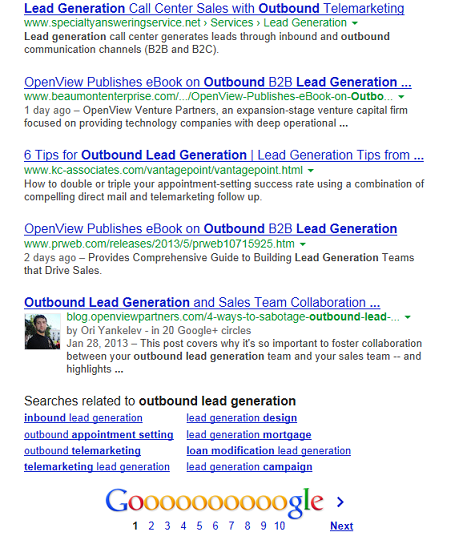
Here’s a search for “Outbound Lead Generation”. These results are from the bottom of the page. The first picture shown is Ori Yankelev’s blog post.
SERPs from Bottom of the Page
Again, the eye is immediately drawn to the personalized result…the result with the profile picture. Even though it is on the bottom of the page.
The first question that needs to be asked is “Does this produce tangible results”? And as a matter of fact, it does.
Sites that have implemented Google Authorship have reported dramatic improvements in click-through rates with individual results ranging from 35% to 150%.
I highly recommend checking out Mark Traphagen’s post on Google+ collecting several individual case studies noting the difference in click-through rates with and without Google Authorship enabled.
Having your picture next to your search results in Google helps lend authority and credibility to your site.
So how do I get my picture up next to my search results?
To start, Google enables its Authorship features through the use of the profile picture that you provide with your Google+ account.
Didn’t think Google+ was going to have an impact alongside Facebook and Twitter? Guess again. Google is leveraging its own social network to powerful and useful effect.
In a nutshell, you want to establish a link between your Google+ profile and your authored content, and ensure that the authored content is using the appropriate tag (rel=”author”) to denote that you are the author.
Here is the step by step on how to enable Google Authorship for WordPress:
Step 1: Make sure you have a Google+ profile
If you haven’t done this yet, take the time to really fill out the information that Google asks you for in your profile. Remember, this is your public face to the world, and Google does use this information as part of its search algorithm. Add your profile picture, information about your business, hobbies…your profile is the place to tell the world about who you are.
Step 2: Add a Contributor Section

Contributor Section from my Google+ profile
Further down the Profile page under the Links section, you’ll find a subsection called Contributor to. This is where you can list all of the sites that you author content for, including your site, and any guest sites. Add the URLs and a title for each site. Above you can see that I’ve added Ariad Partners blog posts authored by myself.
Step 3: Link your Google+ Profile and your Blog

I’m using WordPress here, but the same idea will apply across other blogging tools. In the WordPress Admin Console, under Users -> Your Profile, scroll down until you find the Contact Info section. There is a specific field for entering your Google+ profile URL. I’ve also taken the time to add my biographical info. This is key for a point I’ll show you later.
Step 4: Verify the rel=”author” attribute

Save your changes, and go to your site, and display the source of one of your blog posts or articles in your browser. Look for the rel=”author” link, and verify that the href attribute links to your Google profile.
Step 5: Test it out!
Next, you need to be sure that Google is seeing the rel=”author” information and is associating it properly with your Google+ profile.
Enter Google’s Structured Data Testing Tool (aka the Rich Snippets Testing Tool). This handy little tool lets you get a better glimpse into what Google is looking for in web pages, and how it uses the data.
From here, you can preview an article by entering in its url. You should see your picture next to your blog article. If it doesn’t appear, scroll down and inspect the metadata that Google is seeing when it crawls your page. This tool will help you iron out any kinks when setting up your blog / website to display your picture.
I’m going to check out one of my blog posts, and see what Google sees. Under Authorship Testing Result, you’ll notice that Google has found my Google+ profile link. This is the key to getting your profile picture in the search results for your content.

Google’s Structured Data Testing Tool
Scrolling down a bit further, you’ll see more information about the metadata that Google is able to extract from the page you are previewing.

Once you perform a successful test, and can see your Google+ profile pic next to the result shown, you are almost good to go! There’s just a few extra clean up steps that I like to do as well…
Step 6: Don’t Forget the Blog Archives

WordPress Author Archive Settings
One last thing that I prefer to enable in WordPress is that Author Box on blog posts. This will allow users to see the short bio that you wrote in your WordPress profile when they click on your name in a blog, as well as an archive of your blog posts. Google search results will not typically display your picture next to the archive of your blog posts because WordPress does NOT put your Google+ profile URL as the rel=”Author” of this page….
Step 7: Add Your Google+ Profile Link to your Bio

Google+ Link in the Archived Blog Posts Page
…but we’ve got a little workaround for that! Notice that in my biographical info, I’ve actually included a link to my Google+ and Twitter accounts.

Add the anchor text and href with your profile URL to the biographical info. This will be displayed at the top of the Author page for your blog posts. Google+ will use this link to associate the page with your profile, and now your pic will be displayed in search results for this page.
It’s not just about Authored Content
While we’ve focused on how to get your picture up for authored content such as blog posts and articles, the Structured Data Testing Tool can be used for much, much more.

This same tool can help you create Rich Snippets for search results related to events (think conferences you’ll be attending, seminars, classes), products you offer, applications, reviews, and so on. Each type requires a bit different metadata from your web page, but the tool provides working Examples of each type in the right side drop down box on the Structured Data Testing Tool page. Use these sites as guides on how to highlight even more of your dynamite content.
Some final, important notes
Don’t be surprised if your profile pic doesn’t appear right away! It may take a few weeks, and a few blog posts, before Google starts displaying it next to the search results.
Google recommends that your profile picture be a clear, recognizable headshot in order to get the best results. Substituting brand logos, or obscured photos that only show a portion of your face can end up in Google Authorship not working properly.
Also, once your picture does start showing up in search results, be aware that it will only show up once per page, regardless of how many results from your site you may have on the page. One pic per page is the rule.
Google has made many changes in its search algorithms over the past year that impacted the way businesses create content, and optimize their sites. These changes have been for the better, but they aren’t necessarily quick changes guaranteed to get instant results.
The ease of setting up Google Authorship, combined with the practical, tangible impact of doing so, makes this particular change a slam dunk for anyone looking to be found online.